# Introducing Raft Dedicated Servers
We present RaftDedicatedServer (RDS) – Easily run your Raft world 24/7. Rent a server from BisectHosting or self-hostable for our patrons above $5, RDS offers an unparalleled experience.
{% hint style="info" %}
Want to get your server running within minutes ? Rent a server from [BisectHosting](https://www.bisecthosting.com/raft?r=rdswiki) !\
With their optimized panel, you can manage online players, schedule tasks, easily install plugins, and more.
[BisectHosting](https://www.bisecthosting.com/raft?r=rdswiki) offers the best experience for hosting your Raft dedicated server!
{% endhint %}
Easily rent a server from BisectHosting and get your raft world running within seconds with a one click installation !
{% hint style="info" %}
If you want to self-host your server you can do so by becoming a +5$ patron on our [patreon page](https://www.patreon.com/hytekgames), but keep in mind that self-hosting the software on linux can be challenging, However we've got guides to help you out :)
{% endhint %}
RDS is an application that will manage your raft installation to run 24/7 with no interruptions.\
\
Like our Mod Loader, RDS will allow you to install plugins on your server to allow you to have **minigames**, **pvp arenas**, **ranks/permissions**, **chat commands**, **world protection** & anything you can think about !
\
RDS has 2 networking layers, RTCP and Steam.
* RTCP will use TCP/IP protocol and won't require a 2nd Raft copy.
Note : When using RTCP, steam services are disabled to redirect all the traffic to your server, this means that **vanilla users(\*)** without our mod loader won't be able to join the server.
* Steam will use Raft original networking and will require a 2nd Raft copy.\
***If you rent a*** [***BisectHosting***](https://www.bisecthosting.com/raft?r=rdswiki) ***server you can directly input your 2nd raft account on their panel and make your server available to vanilla users within minutes!***
As you may know, Raft is mostly **client authoritative(\*)** so we are hardly working on making it more secure by going towards a **server authoritative(\*)** solution but that will be in the far future since it is a lot of work to redo most of the raft networking.
In order to currently fight against cheaters, we made a small Anticheat (Thanks to Aidanamite) It will track most known things that we can tracked such as dealing more damages than what you can do, trying to detect if you go too fast, preventing cheaters from dropping cheated items etc. Please note that it is not perfect and will most likely have false positives and won't catch every cheater.
\
\* Vanilla Users : Users that are playing the original game without Raft Mod Loader.\
\
\* Client Authoritative : This means that almost nothing is verified by the server, like your inventory isn't verified by the server so the players can cheat as they like, same for the position etc.
\* Server Authoritative : This means that most things will be verified OR managed by the server, for example your inventory will entirely be on the server and it will tell you what you have in it, so you have NO WAY of cheating, same for your position, the server will do the same moves as you and detect if there's some cheat going on.
# Introducing RTCP (Our custom networking layer)
RTCP stands for RaftTCP. We built our own networking layer to not rely on steam networking. Instead we rely on the TCP/IP technology to provide a stable and fast networking.
As said above, RTCP relies on the **TCP/IP(\*)** protocol, this allows us to provide dedicated servers without using Steam Networking and without being limited on the bandwidth etc..\
\
As we are using a different networking layer than the original game, **vanilla users(\*)** won't be able to join dedicated servers that uses this networking layer.\
\
As we don't rely on the steam services anymore, we needed a way to verify that users aren't using a pirated version and that they really own the account they are trying to join the server with.\
That's why when using RTCP you will need a [Steam Web API Key](https://steamcommunity.com/dev/apikey) which will allow your server to ask steam for authentication verification.\
\
Side Note : The steam API also have some benefits as it will allow you to reject users that are VAC banned, Publisher banned or users using family sharing.\\
\* Vanilla Users : Users that are playing the original game without Raft Mod Loader.\
\
\* TCP/IP : (Transport Control Protocol) provides reliable data transmission service with end-to-end error detection and correction.
# Windows: Installing your server
Installing a Raft Dedicated Server has been made as easy as downloading the software and modifying a text file so almost everyone can do it !
RDS is really easy to install as it is a single application named **RaftDedicatedServer.exe** that you can download on our master website available [here](https://master.raftmodding.com/).
### How to install ?
1 ) Download Raft from Steam and copy all the Raft files in a folder.\
\
2 ) Put the downloaded **RaftDedicatedServer.exe** in the same folder and launch it.\
*Your folder should looks like the following image.*\
\
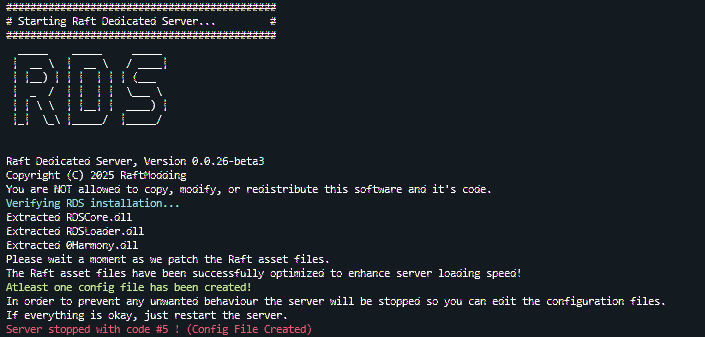
On the first start, RDS will generate all the required directories, required files and the configuration files as shown below.\
\
\
3 ) Now go in `YourFolder/RDS_Data/config` and open the file `rds_config.ini` with your favorite text editor (We recommend [Notepad++](https://notepad-plus-plus.org/downloads/) or [VSCode](https://code.visualstudio.com/)).\
\
4 ) In order to successfully start and secure your server you need an RDS Private Key obtainable [here](https://master.raftmodding.com/keys) and a Steam API Key obtainable [here](https://steamcommunity.com/dev/apikey). After getting both keys, add them in the configuration after the `=` symbol. (If you don't know how .ini config files works, visit our configuration guide available [here](/tutorials/configuring-your-server)).\
*Your configuration file should then be similar to this except it'll have your own private keys.*\
\
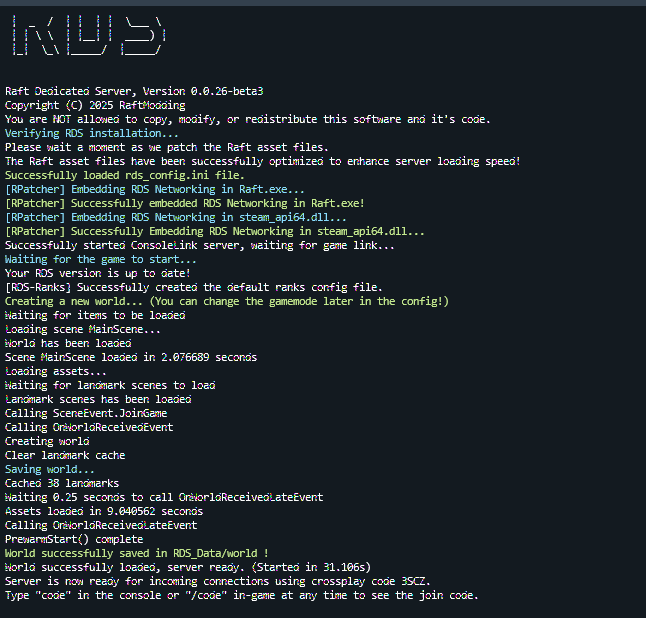
5 ) Finally, start the **RaftDedicatedServer.exe** again and you should be good to go !
# Linux: Installing your server
Installing a Raft Dedicated Server on Linux is a bit more complicated than Windows but if you have some basic knowledge of linux you can probably do it.
{% hint style="info" %}
If you are not experienced with linux we HIGHLY recommend you to simply get a server on [BisectHosting](https://www.bisecthosting.com/raft?r=rdswiki), you'll be able to get your server running within minutes and with their one-click install you'll save a ton of time and money.
{% endhint %}
RDS can run on both GUI based (with a desktop user interface ) and CLI based (with only a command line to work with ) distros. It will work also on distros that aren't Debian based, though the steps will need to be altered:
{% content-ref url="/pages/GRjsGaNYuTjlA0hhYmMX" %}
[GUI based distro: Installing your server](/tutorials/linux-installing-your-server/linux-installing-your-server)
{% endcontent-ref %}
{% content-ref url="/pages/0MXFfW6wZF12JduPfxE8" %}
[CLI based Distro: Installing your server](/tutorials/linux-installing-your-server/linux-installing-your-server-1)
{% endcontent-ref %}
# GUI based distro: Installing your server
Installing a Raft Dedicated Server on Linux is a bit more complicated than Windows but if you have some basic knowledge of linux you can probably do it.
RDS is really easy to install as it is a single application named **RaftDedicatedServer.exe** that you can download on our master website available [here](https://master.raftmodding.com/).
{% hint style="warning" %}
This tutorial has been written for Ubuntu 22.04 LTS.\
It should work on other debian based linux distributions. When it comes to other distro families like Redhat, Arch, ... you will need to adapt the commands.
This guide is for distros that have a user interface. If your distro does only provide a command line [check the other guide.](/tutorials/linux-installing-your-server/linux-installing-your-server-1)
{% endhint %}
### How to install ?
There's two ways to install RDS on linux, you can either use our automated script or follow our step by step tutorial.\
\
If you don't really know what you are doing, we recommend you to use our automated script.
{% tabs %}
{% tab title="Automated Script" %}
1 ) Download our bash script from [here](https://fastdl.raftmodding.com/installrds.sh).\
\
2 ) Put in your home/YOUR\_USER folder.\
\
3 ) Run the command `chmod 777 ./installrds.sh`
4 ) Launch the installation with `./installrds.sh`\
\
5 ) Create a folder for your server.\
\
6 ) Upload all the Raft game files onto your server.\
\
7 ) Download RDS from [here](https://master.raftmodding.com/download) and put it into your server directory.\
\
8 ) Now to run your server go in your server folder with `cd yourserverfolder` and use the following command.\
`/usr/bin/xvfb-run -a -l env WINEDLLOVERRIDES="winhttp.dll=n,b" env WINEDEBUG="-all" wine64 RaftDedicatedServer.exe`\
\
8 ) Now that your server "should" be working, in order to let it run 24/7 when you close the terminal, you can use **screen** with the commands below.\
\
Launching the server :\
`screen -R RDS /usr/bin/xvfb-run -l -a env WINEDLLOVERRIDES="winhttp.dll=n,b" env WINEDEBUG="-all" wine64 RaftDedicatedServer.exe`\
\
To get back in the server window after logging back in into your VPS, type `screen -r`\
To leave your server window without killing it press `CTRL+A+D`
{% endtab %}
{% tab title="Step by step with commands" %}
1 ) Make sure your distribution is up to date.\
Run the command `sudo apt update` to update all your packages.\
\
2 ) Installing the required dependencies.\
In order to run the RaftDedicatedServer.exe file on linux, you'll need to install some third party softwares on your linux server such as [Wine](https://www.winehq.org/) & [Mono](https://www.mono-project.com/).\
Run `sudo apt install -y winetricks xvfb` to install wine.\
Run `wget https://dl.winehq.org/wine/wine-mono/5.0.0/wine-mono-5.0.0-x86.msi` to download mono for wine.\
Run `msiexec /i wine-mono-5.0.0-x86.msi` to install mono for wine.\
Run `sudo winetricks dotnet46` to install .NET 4.6 for wine.
3 ) Configuring winetricks\
Winetricks need to be configured else it'll output many errors when running the server.\
Simply run `sudo winetricks sound=disabled` to disable ALSA sound library from wine.\
\
4 ) Create a folder for your server.\
\
5 ) Upload all the Raft game files onto your server.\
\
6 ) Download RDS from [here](https://master.raftmodding.com/download) and put it into your server directory.\
\
7 ) Now to run your server go in your server folder with `cd yourserverfolder` and use the following command.\
`/usr/bin/xvfb-run -a -l env WINEDLLOVERRIDES="winhttp.dll=n,b" env WINEDEBUG="-all" wine64 RaftDedicatedServer.exe`\
\
8 ) Now that your server "should" be working, in order to let it run 24/7 when you close the terminal, you can use **screen** with the commands below.\
\
Launching the server :\
`screen -R RDS /usr/bin/xvfb-run -l -a env WINEDLLOVERRIDES="winhttp.dll=n,b" env WINEDEBUG="-all" wine64 RaftDedicatedServer.exe`\
\
To get back in the server window after logging back in into your VPS, type `screen -r`\
To leave your server window without killing it press `CTRL+A+D`
{% endtab %}
{% endtabs %}
# CLI based Distro: Installing your server
Installing a Raft Dedicated Server on Linux is a bit more complicated than Windows but if you have some basic knowledge of linux you can probably do it.
RDS is really easy to install as it is a single application named **RaftDedicatedServer.exe** that you can download on our master website available [here](https://master.raftmodding.com/).
{% hint style="warning" %}
This tutorial has been written for Ubuntu Server 22.04 LTS.\
It should work on most other debian based linux distributions. When it comes to other distro families like Redhat, Arch, ... you will need to adapt the commands.
This guide is for Distros that only have a command line interface. If your distro does provide a user interface you should [check the other guide](/tutorials/linux-installing-your-server/linux-installing-your-server).
{% endhint %}
### How to install ?
There's two ways to install RDS on linux, you can either use our automated script or follow our step by step tutorial.\
\
If you don't really know what you are doing, we recommend you to use our automated script.
{% tabs %}
{% tab title="Automated Script" %}
1 ) Upload all the Raft game files onto your server.
2\) Download RDS from [here](https://master.raftmodding.com/download) and put it into your server directory.
3\) CD into your RDS directory
4\) [Download our bash script](https://fastdl.raftmodding.com/installrdsscript.sh) into your RDS directory.\
( `wget`[`https://fastdl.raftmodding.com/installrdsscript.sh`](https://fastdl.raftmodding.com/installrdsscript.sh) )\
\
5 ) Run the command `sudo chmod +rwx ./installrdsscript.sh`
6 ) Launch the installation with `sudo ./installrdsscript.sh`\
\
7 ) Now to run your server execute the following command `sudo ./launchrds.sh`\
\
8 ) Now that your server "should" be working, in order to let it run 24/7 when you close the terminal, you can use **tmux** with the commands below.\
\
Launching the server :\
`sudo tmux new-session -d -s RDS 'sudo ./launchrds.sh'`
Connect to the tmux session:\
`sudo tmux attach-session -t RDS`\
\
To leave your tmux session without killing it press `CTRL+B` then `D`
Heres a useful cheatsheet if you need help with tmux:
{% endtab %}
{% tab title="Step by step with commands" %}
1 ) Make sure your distribution is up to date.\
Run the command `sudo apt update` to update all your packages.\
\
2 ) Installing the required dependencies.\
In order to run the RaftDedicatedServer.exe file on linux, you'll need to install some third party softwares on your linux server such as [Wine](https://www.winehq.org/) & [Mono](https://www.mono-project.com/).\
Run `sudo apt install -y winetricks xvfb` to install wine.\
Run `sudo dpkg --add-architecture i386` to allow us to download 32 bit packages\
Run the command `sudo apt update` to get the 32 bit package registry.\
Run `sudo apt install -y wine32` to install wine32\
Run `wget https://dl.winehq.org/wine/wine-mono/5.0.0/wine-mono-5.0.0-x86.msi` to download mono for wine.\
Run `msiexec /i wine-mono-5.0.0-x86.msi` to install mono for wine.\
\
3 ) Create a folder for your server.\
\
4 ) Upload all the Raft game files onto your server.\
\
5 ) Download RDS from [here](https://master.raftmodding.com/download) and put it into your server directory.\
\
6 ) Now to run your server go in your server folder with `cd yourserverfolder` and use the following command.\
`sudo /usr/bin/xvfb-run -a -l env WINEDLLOVERRIDES="winhttp.dll=n,b" env WINEDEBUG="-all" wine64 RaftDedicatedServer.exe`\
\
7 ) Now that your server "should" be working, in order to let it run 24/7 when you close the terminal, you can use **tmux** with the commands below.
Launching the server :\
`sudo tmux new-session -d -s RDS 'sudo /usr/bin/xvfb-run -l -a env WINEDLLOVERRIDES="winhttp.dll=n,b" env WINEDEBUG="-all" wine64 RaftDedicatedServer.exe'`\
\
Connect to the tmux session:\
`sudo tmux attach-session -t RDS`\
\
To leave your tmux session without killing it press `CTRL+B` then `D`
Heres a useful cheatsheet if you need help with tmux:
{% endtab %}
{% endtabs %}
# Pterodactyl: Installing your Server
Installing a Raft Dedicated Server in Pterodactyl is very easy and straightforward. Pterodactyl is a Game Server Manager that makes it easy to install game servers using "eggs" (custom configs).
## Requirements
* A working installation of Pterodactyl that has at least one node
* Some knowledge on how to use the Pterodactyl interface
## Getting the egg
1. First you need to download the egg from the [github repository](https://github.com/FranzFischer78/RDS-Beta-Docker-Image/blob/main/egg-raft-dedicated-server--r-d-s.json).
2. In your Pterodactyl admin panel go to Nests and create a new nest for Raft
3. Now you can import the egg you just download to the newly created Raft nest.
4. You can adjust the configuration of the egg in case you need to (this is only recommended for experienced users who want to fine tune the egg to their needs)
## Creating the Server
This step is very straightforward if you are already familiar with Pterodactyl
1. Go into Servers in your Pterodactyl admin panel and hit "create new"
2. A few Settings will be important here while you can configure others as you wish
1. Make sure to not Start the server when installed
2. Make sure to give the Server at least 4gb of RAM and 12gb of Disk Space. Also 3-4 CPU cores should be given to the Server for a lag free experience
3. Make sure the correct nest, egg and docker image are selected
4. You can fill out Server variables if you want but you will also be able to edit them later. An important variable is the startup one. This should only be set by the person managing the Panel. It will determine wether nothing gets updated, only the game gets updated, only RDS gets updated, or the Server and RDS get updated.
Set this to:\
\- normal : no updating\
\- updategame: update Raft\
\- updateserver: update RDS\
\- updateboth: update RDS and Raft
5. You can now create the server
3. Now open your newly created server panel. You first need to go to the files tab and upload the `RaftDedicatedServer.exe` . You can download it on our master website available [here](https://master.raftmodding.com/).
4. Next go to the startup tab. Every setting here is optional and you can configure these as you wish but you must set the RDS Master Key. You can obtain it from our [master website](https://master.raftmodding.com/keys). Also if you want the game to update/download automatically (if updategame is set) then you need to specify a steam username and password. Make also sure that the Update Branch is set to public!
5. The Server is now ready to start. The first startup will download the game (if specified). Make sure to allow the steam login/enter the auth code if you have 2 factor authentication enabled.
6. The Server should now have started and you will see that RDS has successfully initialized and prompts a restart. If pterodactyl did not automatically restart the server you can now do so.
7. The Server now restarts and should be accessible through the Server list (if enabled) or the world code
# Docker: Installing your Server
Installing a Raft Dedicated Server in Docker is very straightforward and allows you to run the Server in a Containerized Environment so you don't have to worry about compatibility and OS dependencies.
{% hint style="danger" %}
This currently only works if you use the beta version of Raft and the indev version of RDS. Once the beta version of Raft releases this will work you will be able to switch back to the Raft stable branch as well as the public RDS branch!
{% endhint %}
## Requirements:
* An Installation of Docker
* Some knowledge on how to use Docker is recommended but not necessary to follow the guide
## Creating the container:
1. Pull the docker image using `docker pull ghcr.io/franzfischer78/raftmodding-rds:latest`
2. There are multiple ways you can now work with Files inside of docker. We recommend that you mount a local directory into the Docker Container to make things easier. Prepare a local directory where you will put all your RDS related files into. The RaftDedicatedServer.exe is the only file you need to add as the Game will be downloaded through steamcmd if necessary (this only works if you set the environment variables for steam in the run command). If you do not wish to use the automatic download you can place the game files manually into that directory.
## Running the container
Run the container using the following command:
{% tabs %}
{% tab title="Without Steam " %}
`docker run -v /path/to/local/dir:/home/container -e STARTUP="updateboth" ghcr.io/franzfischer78/raftmodding-rds:latest`
{% endtab %}
{% tab title="With steam to update/download game files" %}
`docker run -v /path/to/local/dir:/home/container -e STEAM_USER="YourSteamUser" -e STEAM_PASS="YourSteamPassword" -e STEAM_AUTH="EmailSteamCode" -e STARTUP="updateboth" ghcr.io/franzfischer78/raftmodding-rds:latest`
{% hint style="warning" %}
The Steam auth code is the code you get by e-mail if 2fa is enabled. If you use the mobile app, you can confirm the login through the confirmations page (so you do not need to add the STEAM\_AUTH environment variable to the run command).
{% endhint %}
{% endtab %}
{% endtabs %}
Set the startup environment variable to whatever fits your needs:\
\- normal : no updating\
\- updategame: update Raft\
\- updateserver: update RDS\
\- updateboth: update RDS and Raft
{% hint style="warning" %}
The STEAM\_USER, STEAM\_PASS and STEAM\_AUTH variables are only used if you want the software to automatically update the game, therefore you do not need to set these if you don't need to update the game or if you wish to manage that yourself
{% endhint %}
If you start the Server now you should be greeted with the following:\\
Head into your RDS folder and edit the following file with your preferred text editor for example nano or vim: `nano RDS_Data/config/rds_config.ini`\
Make sure to set the RDS Master Key. You can obtain it from our [master website](https://master.raftmodding.com/keys). Also make sure to set the UpdateBranch to indev.
Restart the Server and everything should be running!
# Configuring your server
Here we will explain you how to edit the config files to change the behaviour of your server or the punishments/settings of our anticheat.
RDS currently has 2 config files :\
\- `rds_config.ini`\
\- `anticheat_config.ini`\
\- `ranks_config.json`
The `rds_config.ini` file contains the main server configuration such as your server name, the maximum players, if PVP is enabled and more.\
\
The `anticheat_config.ini` file contains the anticheat configuration, However we highly recommend you to keep it as it is by default or contact us if you have any problem.\
If you are experimented, you'll be able to change punishments, thresholds/tolerances & enable/disable modules.
### How to edit the .ini config files ?
The RDS configuration files are [INI files](https://en.wikipedia.org/wiki/INI_file) they are really easy to edit and have comments & sections so that you can know what a config variable do and everything stays nice and organized.\
\
Below is an example `rds_config.ini` file.\
You can see that MaxPlayers has been set to 100, I've changed the server name and that i've configured an icon and a banner.\

### How to edit the .json config files ?
The ranks configuration file uses the JSON file format as it is way easier to add new ranks, configure permissions per ranks and chat prefixes/suffixes.
Below is an example `ranks_config.json` file.\
\\
# Managing Player Permissions
This page will show you the basic commands to set user ranks and grant/revoke permissions.
First of all, when you make changes to your `ranks_config.json` file, you can simply use the command `perm.reload` to reload the configuration rather than restarting the server everytime.
### How to set user ranks ?
In order to set a user rank you can use the command `perm.setrank`.\
The command syntax is `perm.setrank `.\
Here's some examples :
```
perm.setrank TeK admin
perm.setrank TeK user
perm.setrank 76561198127513494 vip
```
### How to grant/revoke permissions ?
If you have all your ranks ready but you just want to give a few extra permissions to a specific user, you can use the `perm.grant` and `perm.revoke` commands.\
The commands syntax is `perm.grant ` (same for revoke)\
Here's some examples :
```
perm.grant TeK worldprotection.*
perm.grant TeK *.*
perm.grant TeK myplugin.commands.hi
perm.revoke TeK myplugin.commands.hi
perm.revoke 76561198127513494 myplugin.commands.hi
```
## RDS Built in permissions list
RDS by default have a few permissions available for its built in features.\
Here's the list of them.
* chat.say - Send messages in the chat. Even without it players can use chat commands.
* chat.kick - Admin command used to kick users from the server.
* chat.ban - Admin command used to permanently ban users from the server.
* chat.unban - Admin command used to unban someone with his steamid.
* anticheat.bypass - Bypass the anticheat punishments.
# How to create a plugin project
Creating a plugin project has never been so easy !
In order to make it easy for everyone to create plugins, we've created a plugin creator tool which will generate you a plugin project that is ready to start programming and already works.\
\
To use the Plugin Creator you have to use a console argument when starting **RaftDedicatedServer.exe** which is `-plugincreator`.\
\
The easiest way is to start CMD, navigate to your server folder and simply run the command `RaftDedicatedServer.exe -plugincreator` as shown below.
### How does it works ?
1 ) Simply enter your plugin name and press enter.\
For the example i'm gonna use the name `MyAwesomePlugin`.\
\&#xNAN;*Once you entered your plugin name it should looks like this.*
2 ) Now that you entered your plugin name, the plugin creator is asking you if you want to change the project path, we highly recommend you to keep the default path and simply type `n` or `no` and press enter.\
\
And that's it ! Your plugin should be created !\\
# How to load my plugin
Loading your plugin is really easy.
If you just created your plugin project let's create a shortcut of your project folder in our plugins folder located in `RDS_Data/plugins` so we won't have to move files or build the plugin each time we modify something in the plugin. Yeah this is a great feature! 😁\
\&#xNAN;*Your plugin folder should looks something like this.*\
\
\
Now that your plugin is added as a shortcut in the plugins folder, RDS will automatically load it by default. We can check it by starting the server and verifying that there's no error and that the plugin default load text is shown as shown below.\
\
\
Now that your plugin is loaded there's some commands built in RDS that you can use :\
\- `reloadplugin pluginName` Will reload the specified plugin and use the new version if you made changes.\
\- `unloadplugin pluginName` Will simply unload the plugin.\
\- `loadplugin pluginName` Will load the plugin if you unloaded it.\
\- `reloadplugins` Will reload every plugins (Highly experimental and should not be used in production!)\
\- `refreshplugins` Will refresh the plugin manager if you added a new plugin file or shortcut so you can then load it with the `loadplugin` command.
# Creating chat commands
This page will help you to create chat commands in your plugins.
Chat commands are created through attributes and only works with STATIC methods.\
Here's different examples :
```csharp
[ChatCommand("hi", "Says hi to you")]
public static string TestCommand(Network_Player player)
{
return "Hi " + player.GetName();
}
```
You can add permissions to command natively.
```csharp
// The last argument is a permission, this will make the command only available
// to users with the said permission granted.
[ChatCommand("hi", "Says hi to allowed users", "myplugin.commands.hi")]
public static string TestCommand(Network_Player player)
{
return "Hi " + player.GetName();
}
```
You can also just make it void and do your own stuff without sending a message to the user.
```csharp
[ChatCommand(name:"hi",docs:"a description",permission:"myplugin.hicommand")]
public static void TestCommand(Network_Player player)
{
// Do your stuff.
}
```
Chat commands can also have arguments with a `string[] args` parameter as shown below.
```csharp
[ChatCommand("mycommand")]
public static void TestCommand(Network_Player player, string[] args)
{
// Do your stuff with the args string array. (does not include the initial command)
}
```
# Creating console commands
This page will help you to create console commands on the server for your plugins.
Console commands are created through attributes and only works with STATIC methods.\
Here's different examples :
```csharp
[ConsoleCommand("hi", "Says hi to you")]
public static string TestCommand()
{
return "Hi console"
}
```
Console commands can also have arguments with a `string[] args` parameter as shown below.
```csharp
[ConsoleCommand("mycommand")]
public static void TestCommand(string[] args)
{
// Do your stuff with the args string array. (does not include the initial command)
}
```
# Player Permissions
This page will help you with checking if a player has a said permission or a group of permissions with wildcards.
RDS have class extensions to Network\_Player and CSteamID.\
This means you can just call for example class.HasPermission() on them.\
Examples :
```csharp
Network_Player player;
if(player.HasPermission("worldprotection.breakblocks")){
// The player have the permission.
}else{
// The player does not have the permission.
// Here you might want to send them a chat message saying they don't have access.
}
```
Permissions also supports wildcards, which means if a plugin have all its permissions starting with `worldprotection` for example, you can just give all permissions with `worldprotection.*`.\
Example :
```csharp
Network_Player player;
if(player.HasPermission("worldprotection.test")){
// This will be true in any of the following cases :
// The user have worldprotection.* permission.
// The user have *.* permission.
// Or the user just have worldprotection.test permission.
}
```




.png?alt=media)
.png?alt=media)
.png?alt=media)
.png?alt=media)
.png?alt=media)